Tips
Leave enough tube length so the unit can be pulled out for easy access when replacing cartridges.
The waste water tube connection should ideally be located on the horizontal section of the PVC drain pipe, before the S-bend.
What's included:

- Initial Setup
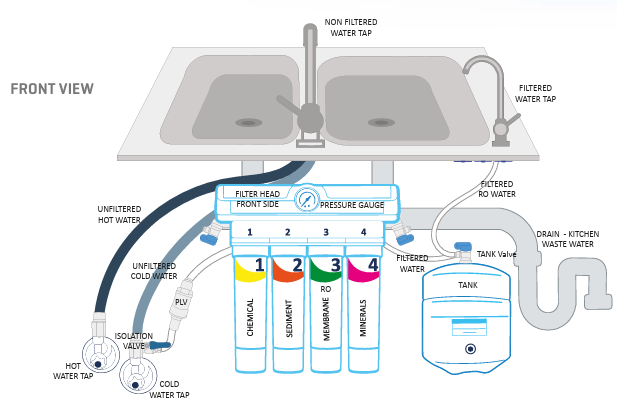
Before you begin, turn off the water supply to the property. Connect the supplied tee piece isolation valve to the cold water supply line under the sink. - Connect the Tubing and Valves
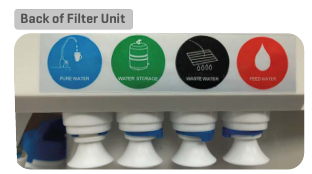
Cut the provided tube to approximately 1 meter in length. Run this tube from the isolation valve to the "FEED" port on the back of the filter unit. Connect the pressure limiting valve (PLV) between the isolation valve and the "FEED" port. Next, run the remaining 6mm tube from the "WASTE WATER" port on the back of the filter unit to your PVC waste drain pipe. To connect this, drill a 6mm hole on top of the PVC waste pipe and use the provided pipe clamp to hold the tube in place. - Install the RO Tank
Screw the RO Tank valve onto the RO Tank, using 12 wraps of Teflon tape for a secure seal. Then, run a tube from the "WATER STORAGE" port on the back of the filter unit to the RO Tank valve. The RO tank can be installed either vertically or horizontally - Install the Filter Tap
Drill a 12mm hole in your sink or stone countertop to install the filter tap. Make sure there is enough clearance underneath to fasten the nut. Finally, run a tube from the "PURE WATER" port on the back of the unit to the filter tap connector. - Install Cartridges and Flush
To flush the system, you must first install the cartridges in a specific order: 1, 4, 3, 2
Before flushing, turn the RO tank off and ensure the sink tap is off. Then, turn the
left flushing valve ON and the right flushing valve OFF. The valve is ON when its blue lever is parallel to the tube and OFF when it's perpendicular. Turn the water source on and flush for 7-10 minutes. This process flushes out the two carbon filters (Cartridges 1 and 4).
After the initial flush, turn the water source off. Set the left flushing valve back to OFF and the right flushing valve to ON. Next, place the cartridges in the correct order for drinking, following the numbers from left to right: 1, 2, 3, 4.
Turn the water source back on. Turn on the sink tap to let out any air until the water begins to dribble. Now, let the water flush for an additional 30 to 40 minutes.
Finally, turn off the sink tap and turn the RO tank valve to ON. The tank will begin to fill, which typically takes about 30 minutes before it's ready to drink. This step can be done by the user after the installer has left the site.